Knowing how to properly mount a rifle scope can ensure your rifle is consistently drilling tight groups.
Properly mounting a rifle scope can seem like a daunting task. However, with the proper tools and the right amount of care, you can ensure your rifle is consistently shooting tight groups. Follow these steps below to lock in your hardware.
How to Properly Mount a Rifle Scope
Not properly preparing all the parts involved is a step that’s often overlooked. And it can cause some problems. Anytime you handle a firearm, check to make sure the weapon is fully unloaded. A round should not be inserted into the rifle during any point of the mounting process.
Place your rifle on a secure platform. A gun vice is extremely useful, especially when torquing screws, but shooting bags or any other secure rest will work.
Next, remove all oil from the rifle and scope mounts. Dip a rag and cotton swabs in acetone, and swab the mounting hardware, drill holes, and screws to ensure all oil is removed. Also wipe down the top of the action around the drill holes where the mount will sit.
When new rifles are shipped, oil is generously applied to prevent corrosion. The same oil can cause screws to loosen and mounts to slip under recoil from the rifle. While the movement might not be obvious to the naked eye, any small adjustments can greatly affect your zero and consistency.
Gun Builder Bobby Hart takes you through the steps in how to properly mount a rifle scope.
Attach the Scope Mounts
Place a very small amount of blue Loctite on the mount screws. Seat the scope mount on the rifle and use your fingers to tighten all screws in the drill holes. Make sure the mount you use is specific for the model of rifle you are prepping.
Once the screws are finger tight, begin securing with a torque wrench until all screws are tightened to 25 inch-lbs. Make sure you don’t tighten each screw completely at once; go little by little.
Attach the Scope Rings
Remove screws from the scope rings and install them onto the scope. Tighten each screw slightly and evenly. The rings should be tight enough where the scope doesn't slide under its own weight but loose enough where you can barely rotate the rings on the scope with a little force. Do this so you can make adjustments after the scope is mounted onto the rifle.
With the rings lightly tightened on the scope, attach the bottom of the scope rings to the base. Lightly tighten the screws on the bottom of the scope rings. Push the rings towards the muzzle of the rifle to ensure the rings are mounted as far forward as possible on the base. When the rifle recoils, it will recoil backwards relative to the scope. With the rings seated forward on the scope mount, it will prevent microscopic gaps that can cause the scope to slide in the mounts.
Adjust and Level the Scope
Once the scope is mounted, close your eyes, and mount the rifle to your shoulder. Make sure you do it naturally and comfortably. Open your eyes to check eye relief.
For proper eye relief, the shooter should not see a black halo when the scope is zoomed to its highest power. If you see a black halo, slide the scope backwards towards your eye until the halo has barely disappeared. Sliding the scope too far towards the shooter’s eye can increase the possibility that the scope will recoil into the bridge of the shooter’s nose when firing, especially with larger cartridges. Because of this it is important to naturally mount your rifle when checking eye relief.
With eye relief set, use a reticle level to ensure your horizontal reticle is perpendicular to the muzzle of your rifle. This is a critical step. If your horizontal reticle isn’t perpendicular, your calculated drop can be drastically altered, and yet again your zero will not be consistent over distance.
Place the magnetic bubble level on a flat part of the rifle, such as the action. Level the rifle with sandbags or a gun vice. Once the rifle is level, hang a plumb bob and rotate the scope until the reticle lines up with the plumb bob. Tighten screws little by little and evenly until they reach 18 inch-lbs of torque.
For an alternate method, use a leveling card, such as the Segway Reticle Level. For this process, level your rifle before mounting the scope. Then slide the card under the rifle scope. Look through the rifle with the cards in your peripheral vision. Rotate the scope until the horizontal level is perpendicular with the stripes. Once again, be sure to tighten screws little by little and evenly until they reach 18 inch-lbs of torque.
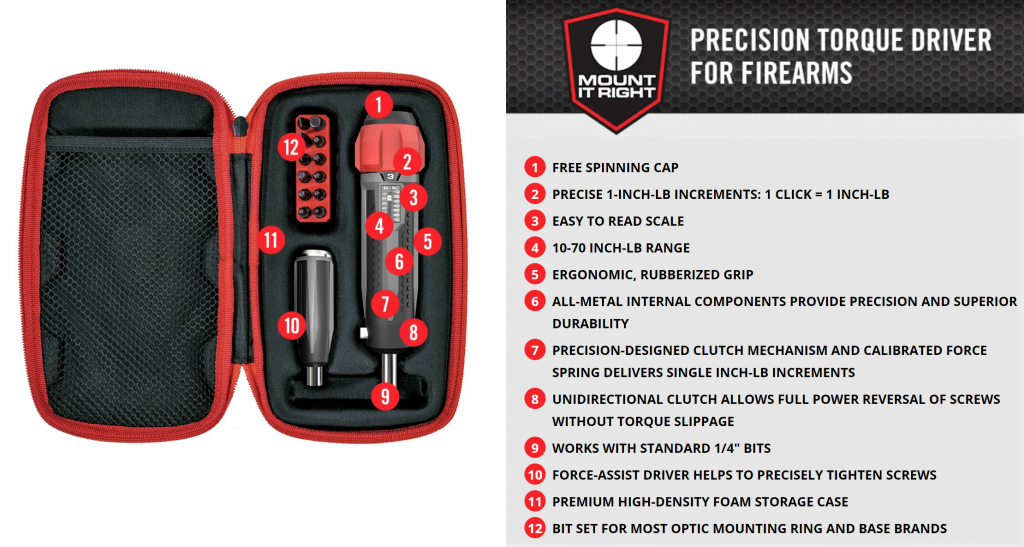
The SMART TORQ by Real Avid provides discrete inch-pound increment settings for spot-on torque adjustments.
Knowing how to properly mount a rifle scope can be a challenging endeavor. But with the proper tools and some practice it’ll become easier over time. Plus, learning the process is one more step in becoming a true rifleman.
Take a deeper dive into the scope mounting process by clicking HERE. We answer FAQs as well as show you the tools and demonstrative videos that walk you through the entire process. Good shooting!